The Shape of Things to Come

Hopefully all of you who have your yarn for the Roan knitalong are happily swatching away. For those of us who don't (yet) it's okay: We still have some brain work to do. It's time to put our imaginations to work, and possibly drag out our sweater collections. Today, I'm challenging you to imagine the shape your Roan will take, in terms of its actual, well, shape.

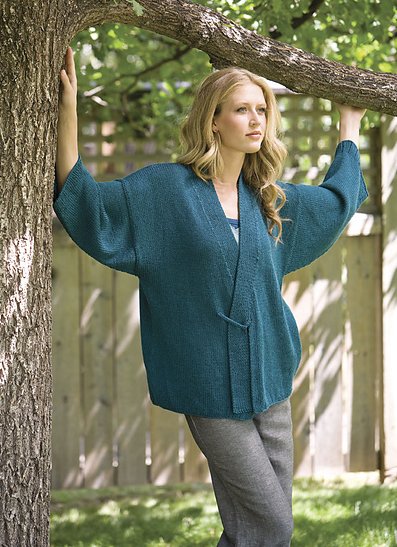
The original Roan was conceived as an extremely loose-fitting, open-front kimono. Not unlike this in silhouette:

If this is the shape you love most for your Roan, then your decision is already made: Kimono it is. The only mystery left is how much wearing ease will be in YOURS. To figure that out, you'll need to take a look at the completed measurements in the Roan pattern, but don't let that be your only source of input. I'd also like you to look at the sweaters (and jackets, and even bathrobes) in your wardrobe. Take these things out and try them on. Take note of those that really fit the way you like. Are they as loose as the Roan? More so? Flatten them out and take their measurements (circumference only for now). Now take your own measurements (get help from a friend if you can). We need the largest part of the body, so if that's the bust, measure there. If it's the hips, take that one. Now compare the measurement of the garment you liked the fit of to your actual body measurement at the widest point. The difference is your wearing ease. If you like the super-loose kimono fit of the original, I'm guessing you'll have a wearing ease of at least 4", and it could even be 6" or 8" if you really like it loose. Not to worry. The only number you need is the widest part of the actual garment you like the fit of. Got that? Great! Hold on while I talk to the rest of the knitters.

Now, this is for you troublemakers who, like me, love the motifs on the Roan sweater, but couldn't care less about the kimono shaping of the original. We who prefer a more traditional silhouette might be pulling something out of the closet that fits like this:

This is a traditional drop-shoulder shape. It skims over the body without hugging tightly anywhere, but without the volume of the loose-fitting original Roan. If this is your preferred look, find the things in your closet that fit like this and measure their circumference. Compare that number to your body measurement at its widest point and you're likely to get a smaller ease number. Yours will probably be less than 4", possibly 2" or 3". Just find the actual circumference of the sweater or shirt that you like the tighness/looseness of. Write that number down and hold on while I address one more group of knitters.

Not into the loosy-goosy look? Want something a little closer to the body? How about this:

This one, while still a drop-shoulder shape like the other two, fits a lot closer to the body. This one has just about zero, or even a slightly negative ease. The distance between this sweater and the body at the widest part of the body is at or close to 0. It could even be a little less than 0, which would make it a negative-ease garment. For you knitters who like to keep it close, this is your fit. Measure the circumference of the garment that you like best and compare it to your body measurement. If the difference is 0 or the garment is a little smaller than your body, you fall into this group. Write down the number, and then rejoin the rest of us.

Now, even though I had you check it, don't worry about which size in the original pattern is yours. It's only a jumping-off place. We're going to abandon the original Rowan sizing, along with the original chart. That's the reason I'm being such a spaz about getting your own personal, accurate gauge.

If you have your magic number (the finished garment circumference) and your actual preferred gauge (stitches per inch of knitting) you are now in total control of whatever happens next. Doesn't that feel awesome? Take a minute to allow yourself to feel drunk with power.

The next step is to figure out how many stitches you'll be casting on. Take the magic finished circumference number (let's be math-y and call it "A"). Multiply that by the number of stitches per inch in your gauge ("B" to us smarty-pants people). So that's A x B. The result is the number of stitches that will be in each round of your knitting. From here on out, let's call that resulting number X. X is our new best friend. X is the number of stitches we will base our whole sweater on, independent of steek stitches (more on that next time), and totally separate from whatever our friends at Rowan may have told us would be in the sweater. That's dead to us now. From here on out it's YOUR Roan sweater. It's good to be King! Now hang on to your beautiful new friend X. Write it down. Embroider it on little hankies. And start thinking about what length of circular needle you'll need to find/procure.

Don't try to cheat with the needle; the wrong length of circular needle can really screw with you, gauge-wise. Too short and you'll have to scrunch up your knitting, which can result in an unintentionally firmer gauge. Too long and you'll be stretching your knitting around it, struggling to move it along, and possible enlarging (loosening) your gauge as you knit. Now is your chance to buy a shiny new circular needle, just for this project. Go crazy and get the one you've always wanted but talked yourself out of. You're going to spend a lot of quality time with this needle, so don't skimp on it. If you already have the perfect one, take a careful look to make sure it's not bent, chipped, splintered, or loose at the joins. Even the best needles get loved to death, so thank it for its service, and replace it if you need to.

I'm traveling to teach over the next few days, so if the blog goes quiet, don't panic. I'll be back soon with the next steps, and hopefully my own Roan yarn will be here waiting for me!

Start Your Engines

Thanks for all of your votes on which yarn I should pick for my Roan Retool, Gentle Knitters! I really appreciate your input, and I'll show you what I decided as soon as the yarn arrives (insert mental image of me with my arms wrapped around my mailbox, here).

I've been hard at work on the chart, as I promised you. So hard, in fact, that I sent a message to Rowan, asking to show them my work, and requesting their permission to offer it to you online. We'll see what they say. Either A: "That's fine, leave us alone", or "No way, you ignorant Yank! That's a Rowan pattern and if you publish it in any way you'll hear from our Solicitors." I feel confident that my version will be so different from the original that I won't be infringing on any intellectual property, but the waters there are always murky. I have to find a way to make my readers happy, keep Rowan from coming after me, and if I'm really really lucky, to recoup a little of the cost of my time. All in a day's work for a knitting designer.

Now that the chart is whipped into shape (I can't wait for you to see it - it's beautiful!), it's time for you to do a little preliminary pattern whispering. For those who have a copy, please take an in-depth read of the pattern instructions. Contemplate their meanings and apply them to your project. Now forget all about them. Here's why:

When we commit to knitting in the round, everything related to flat knitting goes out the window. You're welcome. Rather than get bogged down in Rowan's original instructions, I'm going to help you write your own, one step at a time.

Where do patterns tell us to start? Gauge, of course. So surprising nobody, I'm going to ask you to swatch now, using the yarn(s) of your choice. I'll be doing this right along with you, as soon as my yarn arrives. I want you to make at least three (3!) separate swatches. Please knit them in 2-color stranded st st. Pick any simple chart for this - it doesn't have to be from the Roan chart (unless you want to practice). If you are comfortable doing so, and your yarn will let you, make your swatches in the circular fashion; by which I mean work them on 2 needles, dragging super-long floats of yarn back to the beginning of each row, and working on the knit side only. It will look like this when you are done and break the long floats:

If 1. you are not comfortable enough with this type of swatch to keep the sts at the beginning and end of every "round" from being ugly or 2. your yarn is not sticky 2-ply shetland (the only yarn that swatches effectively in this way), make different kinds of swatches. I suggest:

A. Make your swatch in the round on a 16" needle. Yes, that will be a big swatch. Switch needle sizes at some interval (make yarnovers or purl sts to show you where/what size) to determine the fabric you like best. Later you can either:

1. Close its top and make it a hat

2. Practice steeking techniques on it

3. Frog it because you need the extra yarn

B. You can make your swatch back and forth in rows. Yes, I realize this is antithetical to our purpose here, but for what you need these swatches for, it may be the most expedient route. Choose this option if:

1. You are comfortable working with DK/Sport yarns at this gauge and kind of know what to expect from your yarn and hands

2. You aren't completely unhinged by the idea of purling back in pattern long enough to get 4" of knitting

Here are your goals for swatching:

1. Find the knitted fabric YOU LIKE BEST. This may or may not have any relation to the 6 sts and 6.5 rows per inch that Rowan says we should like. Guess what! When we reinvent the wheel (pattern) we might as well use the knitting we want! I personally would have to wear boxing gloves to get that gauge on those needles, so I'll just make some swell fabric the way my hands like to and go from there, thank you very much. 

2. DO NOT TWIST THE STRANDS on the back of your work. Choose an orientation for your strands (i.e. white always passes under red and red always passes over white) and never deviate from it. EVER. Even if you've never knit stranded colorwork this way before and it makes your teeth itch, do it anyway. I have redrawn the chart so that you will never have to tack a single float, so stop doing that now. These swatches are the perfect place to practice.

3. MAKE SURE YOUR FLOATS ARE LONG ENOUGH. How long? When you look at the back side of the swatch, you should see them drooping a little bit, like swags. Each one should "smile". If you don't see swags/smiles, your floats are too tight. Trust me: The extra float length will disappear, and never be missed. Without it, your knitting will permanently change size and shape the minute its allowed to, usually becoming smaller. Be sure to ask for the interpretive dance when you see me.

4. If you hit your dream gauge on the first try, congratulations, you are a Supreme Being and we love you for it. Bind off your swatch and wait for the rest of us mortals to catch up. While you're waiting, make 2 more swatches, at any gauge.

5. Once you have three distinct pieces of knitting (or one big one if you went with plan A), and you love at least one of them, wash and block it exactly as your yarn manufacturer suggests. No rougher, no more gentle. Once that's done, re-measure to make sure nothing drastic happened to your gauge during blocking. If all looks good/normal, you're ready to proceed. If not, take a look at what went wrong and let us know over on Ravelry or here in the comments if you need backup. This is the critical juncture to notice that your yarn pills, or shrinks/stretches, or otherwise turns to crap. If you suspect any of these atrocities has befallen you, get a second opinion. DO NOT lie to yourself and say it will all be fine. Better to be honest now than a year of knitting from now. I'm being cruel to be kind, and you know I'm right. I want this sweater to be your proudest yet, and that starts with having the right yarn.

6. What do we do with the other 2 swatches? So happy you asked. One I would like you to block as gently as humanly possible. Perhaps a gentle mist of water, or a delicate spritz of steam. Let dry and measure/compare to the first. Notice anything different? Does your yarn like it better when you treat it even more gently than the label instructs? If so, beware. This yarn may not like being frogged while you work. It might not like being worn in humidity. There is only one way to be sure before you wholeheartedly commit to using it. And that is:

7. Take the last swatch and beat the tar out of it. Throw it in the washing machine to soak. Subject it to extremes of temperature (hot and cold rinses). Rub the pretty side of it against your denim-clad leg (or even the sidewalk) for a few minutes and see if you can make it pill. If it's superwash, stick it in the dryer. You get the idea: I want you to find out where this swatch's breaking point is. If it takes less than you expect, have a long stern talk with yourself about yarn and the nature of commitment.

8. If you started out with one big swatch, you can either wait until you have practiced steeking on it and do the durability tests then, or you can make some little solid-color bits to play rough with.

9. And while you're at it, you might as well do the wearability test: Put a swatch in your bra and see how long you can stand it. If you're planning on wearing a yarn next to your skin, this is the only way to know for sure...You're Welcome.

Okay, my friends. That should be enough to keep you out of trouble for a little while. Go forth and swatch. And let me know what you learn! Oh, and hold on to these swatches, even if they are beat up. We're going to need them again before we're through. 

Retail Therapy

Is there any higher form of shopping than yarn selection? I think not. I'm doing the online kind today, which holds its own challenges and delights.

The first challenge is that I can't touch the yarn. Careful checking of the fiber content will be necessary to predict how the yarn behaves, and an element of chance is assumed. The second is trying to see how the colors will behave together, This one is pretty easy: I take screen shots of the yarns I'm considering, and layer them together with the pattern photo (or sketch, if it's my own design). I do this in MS Word or MS Publisher, if you're wondering. Notice how I try to show each color in proportion to how much of it will be used? I've added a 4th contrast color, too, by the way, because I have no self control. I'm thinking to use it in the peerie bands between the knots on the upper body. Or not. We'll see.

55% Merino, 25% Alpaca, 20% Donegal Tweed 

Predictions I can make about this yarn: Alpaca is very soft, as is Merino. So what this yarn lacks in "backbone" it will make up for in drape. The tweedy look feels authentic to the original, if that's what I'm going for. Every color here has the same color "Neps" or tweedy bits (black, white, gray and tan), which will lend the whole piece cohesion when used together. It may also tend to flatten and homogenize the design. The angle of twist here is not as high as I usually prefer for ideal stitch definition, but I can compensate by making sure my color contrast is as high as possible. Maybe switch to Charcoal for the MC?

95% Wool, 5% Cashmere (Actual yarn name is "Debbie Bliss Fine Donegal")

This one is more of a mystery. What kind of wool? Will it be the typical crunchy stuff I usually expect with tweed from the UK? What about the cashmere? Is it really spun into the yarn, or are only the Neps cashmere? I suspect the latter. My intuition tells me this is a sticky, crunchy traditional tweed with cashmere neps, which give it the fantastic color variations. Notice too, that there is barely any twist here: I'd bet it's one of those 2-ply yarns masquerading as a singles, with just enough twist to hold the plies together. A sweater made with this yarn will not be as soft, or as drapey as either of my other two choices. Because there are no purl sts in Stranded Colorwork, I need to be aware that Singles and Singles-type yarns may have a tendency to torque the body tube. Ever have an old t-shirt that has been washed so many times it spirals around the body? That's what happens with singles yarns, if you don't take precautions. These would include knitting at a firmer gauge, adding purl sts, and/or combining other, plied yarns into the design. Adding the center steek will also help, as would some Elizabeth Zimmerman "phoney seams" at the sides, if it really became an issue.

50% Fine Merino, 25% Baby Alpaca, 25% Mulberry Silk

This yarn appeals to me for all the things it isnt: Nuppy, crunchy or matte. Get a load of the shine on it! I also love the high twist in the plies, and the particular iteration of my chosen color scheme. Using this would lose all the the blurry, watercolory qualities of the soft tweed colors, so it's unfaithful to the original concept. But it would have that dreamy sheen, and most likely a lot of drape and softness.  I usually err on the side of more primitive, high-contrast combinations, so this really appeals to me.  Subtle isn't typically my bag. I have to decide whether I prefer to stay true to the original design concept, or branch out and do my own thing. 

Post a comment, won't you, and tell me which of these is your favorite and why?